When we think about upgrading our car features, windshield wipers are rarely the first thing that comes to mind. But without capable windshield wipers, driving in weather adversities would be a nightmare. So, you should invest in premium-grade wipers if the budget permits.
Rain X is one of the most high-end wipers you can choose for your vehicle. Their rugged build makes them a perfect pick for all-season driving. In this piece, I will demonstrate how to put on Rain X windshield wipers.
Let’s start with J hook wiper arms before moving on to other wiper arm types.
Read More: Rain X Wiper Blades Won’t Click J Hook
How To Install Rain X Wiper Blades On J Hook Wiper Arms?
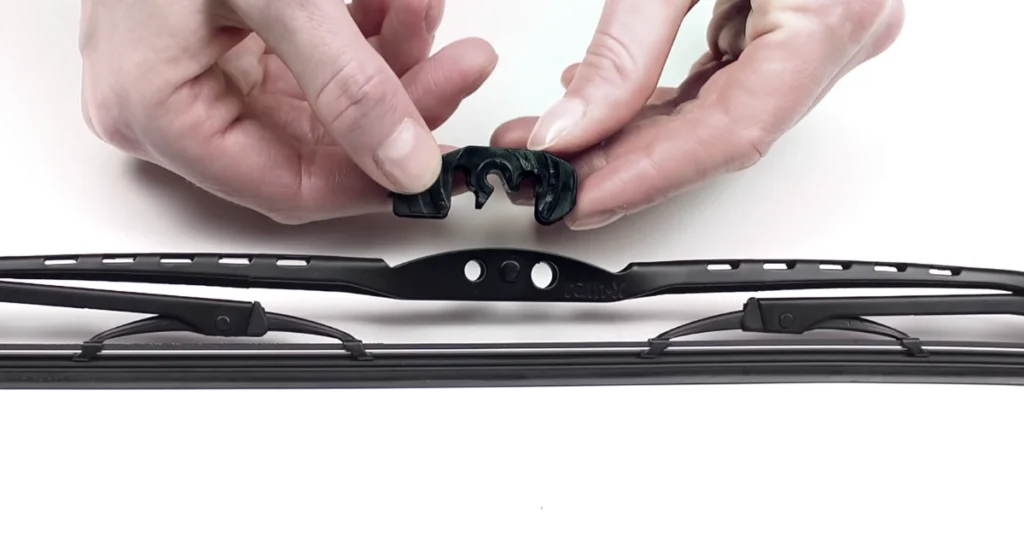
Step 1: Remove The Pre-Installed Adapter
To begin, you will have to take off the pre-installed adapter on the Rain X wiper blade. Grab the wiper blade frame with one hand and push the adapter up with the other. It won’t require much effort to pop out.
Step 2: Install The New Adapter
Next, you will have to take the new adapter out of the package and install it to the Rain X wiper blade. How should you position the wiper blade? You will see that the adapter has a tab on one end. That side will go towards the smallest hole on the wiper blade.
Place the adapter’s center channel on top of the cross pin of the wiper blade. Firmly push the adapter into the wiper blade bracket, and you will hear a clicking sound. The new adapter is now set with the Weatherbeater blades, and they are ready for installation.
Step 3: Attach The Wiper Blade To The Wiper Arm
After you remove the old wiper blade, leave the wiper arm raised. Place a towel underneath so that it doesn’t suddenly fall, and smash your windshield. Take the wiper blade and insert the top part of the wiper arm’s J-hook through the opening of the wiper blade.
Run the wiper blade into the J-hook and pull upward to secure its position. After the blade locks into the wiper arm, pull it and ensure it is firmly attached to the arm. Slowly lower the arm into the windshield.

Read More: Rain X vs. Michelin Wiper Blades
How To Install Rain X Wiper Blades On I&L Wiper Arms
Step 1: Remove The Connector From The Blade
The wiper blade will have a stock connector. You have to remove it before installing the blade on the I&L arm of your vehicle. Hold the blade firmly in one hand and grab the connector with the other. You can pull out the connector easily.
Step 2: Put On The New Connector
Place the connector on top of the bracket mount and push it down. You should immediately hear a clicking sound. That means the connector is now locked into the wiper blade. So, it’s all set for installation.
Step 3: Attach The Wiper Blade To The Wiper Arm
Again, don’t forget to keep the wiper arm raised after you remove the old wiper blade. Secure the windshield with a towel so that it doesn’t crack if the wiper arm accidentally falls down. Take the wiper blade and see where the grooves are.
The grooved portion of the connector will go inside the hooked section of the wiper arm. Push the blade into the wiper arm through the connector. After you reach the end of the hooked section, slide the locking tab down.
Pull the blade to verify that it has actually fastened. Remove the plastic covers from the blade and gently put the windshield wiper back down.
Read More: Rain X vs. Bosch Wiper Blades
How To Install Rain X Wiper Blades On Bayonet Wiper Arms?
I will not explain the first two steps in this case because they are the same as they were for the J hook installation. Remove the adapter, install the new one, and then attach the blade to the bayonet wiper arm of your vehicle.
Push the adapter outward to create an opening to put the blade into the wiper arm. Slide the front end of the bayonet arm into the opening and keep on sliding the blade in until it locks. Tug on the blade to confirm that it has been attached the right way. Gently rest the wiper arm on the windshield afterward.
How To Install Rain X Wiper Blades On Large Pin Wiper Arms?
Step 1. Remove The Stock Adapter
Hold the blade in one hand and push the adapter upward using your other hand. The adapter should come off.
Step 2. Connect The New Adapter
The new adapter will go into the vacant adapter slot. Position the adapter so that the end with the tab goes towards the side of the wiper blade with a small hole. Align the adapter’s center channel with the blade’s cross pin.
Lock the adapter into place by pushing it into the cross pin. After you hear the click sound, push down the front end of the adapter by 45 degrees. This will free up the large hole in the wiper blade and make room for the pin arm to go through it.
Step 3. Connect The Blade To The Wiper Arm
The wiper arm of your car should be in a raised position after removing your old wiper blades. Run the wiper arm pin through the big hole of the blade. Push down the front part of the adapter, and the blade will get locked to the wiper arm. Yank on the blade to confirm that it is firmly locked in place.
How To Install Rain X Wiper Blades On Pinch Tab Button Arms?
Step 1: Remove The Stock Connector
Hold down the blade with one hand and grab the connector with the other. Move your hand up and down, and try to pull it out. It might require a bit of force, but the connector should come off. You can also use a flathead screwdriver to pry off the connector.
Step 2: Install The New Connector
Put the new connector on the bracket mount. The front part of the connector should point toward the arrow sign on top of the mounting bracket. Push it down to lock it in place.
Step 3: Connect The Wiper Blade To The Wiper Arm
There should be teeth-like extensions on the upper end of the wiper arm. You will find matching slots for them on the wiper blade. Align them, push the connector down, and lock the blade by sliding down the locking tab.
How To Install Rain X Wiper Blades On Narrow Pinch Tab Button Arms
Step 1: Remove The Pre-installed Connector
Put your thumb under the connector cover and lift it out. Lift the connector and remove the blue spacer in it.
Step 2: Connect The Blade To The Wiper Arm
Channel the front end of the wiper arm into the blade’s connector through the opening. Push the blade down until the tip of the wiper arm hits the back of the connector. It should lock into place at that point.
Final Words
We detailed how to put on Rain X windshield wipers for various wiper arm types so that you can learn about the installation process comprehensively. You can now install Rain X wiper blades on your car regardless of the wiper arm type it has.