Are you looking to enhance your driving experience and increase safety on the road? One popular gadget that can help you achieve this is a dash cam.
A dash cam is a small camera that mounts onto your windshield and records video footage while you are driving.
It provides valuable evidence in case of accidents, helps prevent insurance fraud, and captures memorable road trips.
If you’re wondering how to attach a dash cam to your windshield, this guide will walk you through the process step by step.
Whether you’re a newbie or a seasoned driver, installing a dash cam is a simple and straightforward procedure. So let’s get started!
Read More: How To Restore Plexiglass Windshield?
How to Attach Dash Cam to Windshield?
Attach a dash cam to the windshield by following these simple steps. The process involves cleaning the glass surface, positioning the mount, and securing the camera firmly to ensure clear recordings.
Preparing The Windshield And Dash Cam
To attach a dash cam to your windshield, it’s important to prepare both the windshield and the dash cam properly. Start by cleaning your windshield thoroughly to ensure a secure attachment. Use a glass cleaner and a microfiber cloth to remove any dirt or grime.
Next, clean the dash cam itself using a soft cloth to eliminate any fingerprints or dust. Once both are clean, make sure to check the laws and regulations in your area regarding dash cam usage. Different locations may have different rules on where and how dash cams can be placed.
By following these steps and being aware of the rules, you can successfully attach your dash cam to your windshield and ensure it functions optimally.
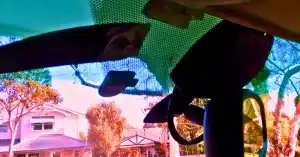
Attaching The Dash Cam To The Windshield
Attaching a dash cam to the windshield requires careful positioning of the mounting bracket. Place the bracket securely to ensure the dash cam stays in place while driving. Position it in a centralized location to capture a wide view of the road.
Clean the windshield before attaching the bracket to remove any dirt or debris that may cause the adhesive to weaken. Press the bracket firmly on the windshield and hold it for a few seconds to ensure proper adhesion. Once the bracket is secure, attach the dash cam onto it, making sure it locks into place.
Test the dash cam’s stability by gently shaking it to ensure it doesn’t move or fall while driving. By following these steps, you can easily attach your dash cam to the windshield for reliable recording.
Testing And Adjusting The Dash Cam
Attaching a dash cam to your windshield is a simple process that requires testing and adjusting. Firstly, it is important to test the video recording function to ensure clarity and accuracy. This will allow you to capture any incidents or accidents on the road effectively.
Additionally, ensure that the dash cam’s features such as motion detection and loop recording are properly activated and functioning. Adjusting the dash cam for an optimal view is crucial for capturing the desired footage. Position the camera in a way that doesn’t obstruct your view of the road, while still capturing the necessary visual information.
It is recommended to experiment with different positions and angles until you find the perfect spot. Remember to clean the windshield thoroughly before attaching the dash cam to ensure a secure and stable connection. With proper testing and adjustment, your dash cam will be ready to provide you with peace of mind on the road.
Maintaining The Mount And Dash Cam
To ensure the mount is secure and stable, it is important to follow proper installation instructions. Clean the windshield and dash cam regularly to maintain clear visibility.
Check for any loose screws or parts, and tighten them if needed. Avoid placing the mount in direct sunlight to prevent overheating.
Use adhesive pads or suction cups for better stability. Double-check that the mount is firmly attached before securing the dash cam in place.
Avoid obstructing your view while driving. By taking these steps, you can ensure that your dash cam is securely attached to the windshield and functioning effectively.
Read More: How To Fix Pitted Windshield
Additional Tips And Troubleshooting
When attaching a dash cam to your windshield, it’s important to consider additional tips and troubleshooting strategies for a seamless installation.
One common challenge is hiding cables for a clean look. Start by carefully positioning the cam to ensure optimal visibility and minimal obstruction.
Next, use cable clips and adhesive pads to secure the wires along the windshield’s edges and under the dashboard.
If you’re concerned about visibility from outside the car, try tucking the cables in the weather stripping or headliner. Another option is to use a cable management kit specifically designed for dash cams.
Troubleshooting common issues, such as loose connections or interference, may require checking the power source, updating the firmware, or adjusting the camera settings. Follow these guidelines for a successful dash cam installation.
How Do You Attach A Dash Cam To A Windshield?
Attaching a dash cam to a windshield is easy. Start by choosing the right spot on the windshield, preferably behind the rearview mirror.
Clean the area thoroughly, remove the adhesive backing of the dash cam mount, and firmly press it onto the windshield.
Finally, attach the dash cam onto the mount and adjust the angle as needed.
Can A Dash Cam Damage Your Windshield?
No, a dash cam will not damage your windshield if properly attached. The adhesive used in dash cam mounts is designed to be gentle on the glass surface.
However, it is essential to follow the manufacturer’s guidelines and avoid excessive force during installation or removal to prevent any potential damage.
How Do You Hide The Dash Cam Cables On The Windshield?
You can use a cable management system to hide the dash cam cables on the windshield. Start by routing the cables along the windshield edges or the vehicle’s interior trim. Use adhesive clips or cable ties to secure them neatly.
Additionally, you can consider using a cable concealer or tucking the cables behind the headliner for a more discreet appearance.
Andy’s Opinion
Attaching a dash cam to your windshield may seem like a daunting task at first, but with the right steps, it can be done easily and securely. Start by selecting the right position on your windshield that provides a clear view without obstructing your vision.
Clean the area thoroughly and use the adhesive mount provided with your dash cam to attach it firmly. It’s important to follow the manufacturer’s instructions and consider using additional cable management tools to keep the wires organized. Remember to test the dash cam before hitting the road to ensure it is functioning properly.
With your dash cam securely attached, you can enjoy the peace of mind that comes with having a reliable witness during any unforeseen incidents on the road. So don’t hesitate, follow these simple steps, and start recording your journeys with confidence.